2

Christmas!

Happy Boxing Day!
I hope everyone had a really lovely day. We did!
On Christmas Eve after a mad dash to four hairdressers to try and get Harrison’s haircut, we went to visit my Great Uncle. It was lively because the kids usually go a bit shy around him but not this time! They loved chasing each other around and showing off in their Santa outfits. My brother got a lovely photo of them!
image

We then went to the cemetery and laid down some flowers for my Grandad, before heading over to my Nans. It was a hit manic as always, with my parents, brothers, sister in law, the kids, my nan,my auntie, uncle and youngest cousin! It was lovely though. We then went home, stopping off to pick up a McDonald’s for tea. Once we had eaten it was time to go outside and look for Santa and his reindeer flying over (the international space station all lit up!). Harrison was amazed! We then sprinkled our Reindeer food and left out the magic key for Santa.

They had a bath and then got dressed in their new pyjama s from Nanny and Grandad. They went to bed and we enjoyed a nice glass of wine and a horror film.

We all got up about 7.30 on Christmas day which is half hour later than usual! Harrison’s face when he went down and saw all the presents was amazing. They were spoilt – happyland sets, vtech digital camera, train sets, books, dvds, clothes, market stall, toy till…. And that was before we went to my parents!!!

After breakfast we loaded up the car with gifts and went to my mum and dads, where the kids got even more playdough, happy land, clothes and gorgeous wooden Melissa and Doug toys! I was very spoilt too – I had a Hudl, two beautiful bracelets, necklace and two lovely teacups for my collection.

The rest of the day went in the normal Christmas day way – an incredible dinner cooked by mum, a few drinks, playing with new toys and gadgets and eating chocolate. When we got home the kids went straight to sleep which is unheard of – the excitement wore them out!

Today has mostly been all about setting up and playing with new toys and finding homes for them! I doubt we’ll be doing much crafty stuff for the next week whilst they play with everything, although watch out for reviews of some of their toys and loads of playdough ideas!

How was your Christmas?

5

Boozy brandy truffles (definitely not for kids!)

Ok, so I know this is supposed to be all about kids, but couldn’t resist sharing this. These boozy truffles are definitely not for kids!
My lovely sister in law, Kim, makes these every year. Let me tell you, they are usually demolished within seconds. She’s so far taunted me with these pictures, and I know that there is a box waiting to be eaten at my parents.
She’s been lovely enough to share her recipe with me (and you!)

Ingredients:
150g Bournville or other good quality dark chocolate
40ml brandy or rum
50g unsalted butter
60g icing sugar, sieved
50g ground almonds
About 16 small paper cases

Break about two thirds of the chocolate into a bowl and put this over a pan of hot water. Add the alcohol and leave to melt. Take off the heat and stir in the butter, which shouldn’t be too hard. Mix in the sieved icing sugar and group almonds until well blended.

20131223-201218.jpg

Leave in a cool place until the mixture is firm enough to handle. Divide into about 16 even sized pieces and roll into balls. Grate the remaining chocolate, place on greaseproof paper and roll the truffles in it – you could also roll it in those chocolate hundreds and thousand bits. Put into the little cake cases.

These are gorgeous. A little tub of them would make a fab gift – if you could resist eating them first!!

20131223-201506.jpg

20131223-201513.jpg

Thanks to Kim for sharing the recipe and for the photos!

0

Snowman Soup

This lovely idea was shared by my good friend Donna. I wish I’d heard of it earlier because I’ve ran out of time to make it, but thought I’d share still!

This would make a lovely gift for someone or would be perfect in a Christmas Eve box. Think we’re going to add this to our Christmas Eve box tradition next year!

To make it all you need is hot chocolate powder (enough for a decent sized mug), some mini marshmallows & a mini candy cane. You also need a copy of the poem (this is the one Donna used) which you can print off here.

“I was told you’ve been good this year
I’m always glad to hear it
With freezing weather drawing near
You’ll need to warm your spirit
So here’s a cup of snowman soup
Complete with a stirring stick
Add hot water, sip it slow
It’s sure to do the trick”

You need to put the hot chocolate powder in a bag – the icing decorating ones are probably the best as they can made into a cone shape which look good. Top with the marshmallows and then seal the bag with an elastic band. Tie a ribbon around it and attach the tag. Stick two googly eyes on to the bag and hook the candy cane on to the ribbon.
Now you have snowman soup!

20131222-182937.jpg

0

Peg people nativity scene

We’re not a religious family. To be honest, the only time we really go to church is for weddings and funerals, although when the kids are older I’d love to take them at Christmas: that aside, I think it’s so important that kids know what the true meaning of Christmas is. We may not practise it, but we are Christians so we should know about it.
Today, I made a little nativity scene to start introducing the idea to the boys.
It only took ten minutes.
With Graham’s help (and a big knife!) we cut a craft peg down to make baby Jesus. I covered an old match box in masking tape and lined it with cotton wool (if you have straw it would make a great sensory activity!). I wrapped a small piece of felt around him and tied it on with string and drew him a face with a black pen.

20131222-124035.jpg

Mary and Joseph both had little capes of felt tied on with string and felt tipped faces.

20131222-124316.jpg

The angel had a little white cape on and I used the glue gun to glue a little pipe cleaner halo on his head

20131222-124502.jpg

To try and complete it I added a few if the animals from their various sets and used play dough to hold it onto the base (a piece of cardboard).

They had fun playing with the little scene, making sure baby Jesus was cosy and tucking him in!

I will keep this little set safe so that as they get older they can use it to tell the story.

20131222-124809.jpg

0

Melted snowman

Today we made some melted snowman, inspired by this post by Kiwi Crate.
Such a simple, abstract activity that is perfect for toddlers as there is no right or wrong way to do it. We just used our sponge paintbrushes (which we get from The Works to splodge white paint onto blue paper. Once it was dry, Harrison glued on googly eyes, punched out circles of black paper for buttons, a cut out hat and scarf and an orange nose. He could put these wherever he wanted! It was a great opportunity for some early science – we talked about the snowman melting when he gets warm.

What do you think?

20131213-160832.jpg

0

Reindeer and Santa handprints

We have made some lovely decorations today that can double up as fab keepsakes!

The first one we did was a friendly little reindeer. We painted our hands with brown paint (super sensory fun and a great opportunity to talk about how it felt on our hands – slimy, sticky, cold etc). Then we printed out hands onto some white paper and left to dry.
Once dry, we cut them out and backed them onto black card, and then stuck
on googly eyes and a red pom pom for a nose. I did use our low heat glue gun for this to make sure they stayed on. We then glued some string to the back so that we could hang them on the tree, not forgetting our names and the date on the back, so we can look back at them in years to come.
Hasn’t he got a friendly little face?

20131212-221904.jpg

Our second one was a Santa handprint. We mixed red and white paint together and painted our palms pale pink, then painted fingers white and carefully made a print on some white paper. Once they were dry we backed them onto some lovely textured cream paper and then onto red paper. Then we cut out a sort of lopsided triangle to make a hat and glued that on, added some cotton wool for the pom pom. Some tiny fluffs of cotton wool made his eyebrows and moustache, and our white fingerprints became his beard. Finally, we drew on eyes and nose with black pen.
Cute or what?

20131212-222245.jpg

Do you have any ideas for handprint decorations?

0

Hatton Country World & Adventure Farm

We were sent some family tickets to visit the adventure farm at Hatton Country World, with passes to see Santa. With only two weekends left until Christmas, and presents still to buy, we thought we better get going yesterday!
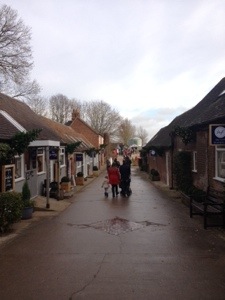
It was a cold but lovely sunny day so we wrapped the kids up and jumped in the car. It’s about 15 miles down some lovely roads to Hatton from where we live, so didn’t take us too long. When we got there just before 12pm, the car park (free parking, always a bonus!) was already filling up. We had a quick wander through the shopping village, which hasn’t changed much since I last went when I was a little girl – lovely little shops selling candles and soaps, garden ornaments, homewares, pretty furniture, toys and more.

20131209-110751.jpg

There was a small queue to get into the farm but it moved fairly quickly. To pay for our tickets would have cost us nearly £30 (and that’s with Alex being free as he’s under 2!) so not the cheapest day out.
The farm though, to be fair, is huge. Including a half hour stop for lunch it took us a good 4 hours to go round.
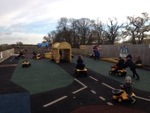
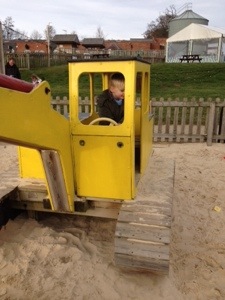
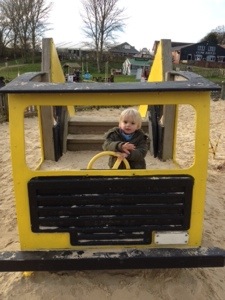
The first thing we did was visit the JCB track, a child sized ‘road mat’ with ramps, cones and tunnels with ride on JCB diggers. Having two digger mad boys, this was a great start to our day! There were plenty of toys to ride on even though it was busy – a nice surprise!

20131209-111426.jpg

20131209-111436.jpg

When we finally dragged them away we saw the goats and pigs, which we had fun feeding. You can buy a cup of animal feed for 50p from the kiosk as you walk in.

20131209-111835.jpg

20131209-111922.jpg

We then wandered down to look at the birds before coming to an attraction where you could pan for gold. Sounds fantastic but it was deserted and the water looked filthy, so we quickly moved on! Next to this was another attraction which looked to be some sort of duck race but again was deserted and looked like it had seen better days!

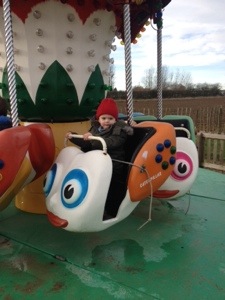
The leaflets and website advertises ‘festive fun fair rides’ but to be honest these were really disappointing. Three tiny little rides – a spinning teacup ride, a ladybird ride and flying caterpillars – not festive in the slightest. Not only that, the one wasn’t working. Still, the kids had fun.

20131209-124431.jpg

We then played on the climbing frame, had a bounce on the trampolines and played on the tractors. We especially loved the digger sandpit, which considering it’s a farm and the time of year was spotless and lovely. The kids really enjoyed using the buckets and spades and climbing on the equipment!

20131209-124711.jpg

20131209-124720.jpg

20131209-124736.jpg

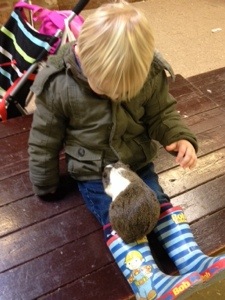
We them went to my favourite bit – the animals! There was a lovely variety of animals including donkeys (in a nativity scene!) sheep, goats, pigs, alpacas, rabbits which were all really friendly and tame enough for the kids to stroke. Plenty of places to wash hands and lots of signs to remind you as well. We loves the guinea pig petting area. Harrison loved holding them!

20131209-125110.jpg

By this point it was almost 2pm and we were hungry! After a quick loo stop and nappy change (toilets ok but definitely room for improvement!) we went to the restaurant attached to the soft play centre – and immediately walked back out ! Absolutely full to the ceiling, noisy and no where to sit. We left the farm area (wristbands allow you to go in and out) and went to another restaurant/coffee shop which although lovely wasn’t really toddler-friendly. Limited food choices – cakes, soup, panini and one or two meal options and that was it. It cost us almost £18 for a bottle of pop, hot chocolate, a pot of tea, a scone and some fish and chips, which were all very nice.

20131209-125548.jpg

Then we paid a visit to Santa. Sadly at this point my phone went flat so I couldn’t take photos! We walked through the elves workshop and winter wonderland which was really magical and enchanting. There are little tables for kids to write letters to Santa. The queue was quite long but moved fairly quickly, but it was a lovely wait surrounded by trees, lights, penguins and polar bears!
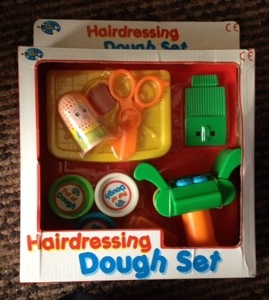
When we got in to Santa the kids went a little shy (nothing unusual for toddlers!) and didn’t really speak. I have to admit, ‘Santa’ really annoyed me as he said that Harrison ‘should be speaking at his age’ – he’s 2, and quite rightly is weary of strangers. Was not impressed! The kids were given keys to choose a present from the toy shop, which was huge and had a massive choice of gifts suitable for
all ages, and we’re pretty decent gifts. Harrison chose a hairdressing play dough set and we chose some animal foam stickers for Alex.

20131209-130426.jpg

20131209-130508.jpg

After coming out we fussed and stroked the reindeer and then decided it was time to head home as it was nearly 4pm. We hadn’t had chance to visit the kids disco or magic shows. It was starting to get dark and with the fairy lights around and the Christmas music playing through the speakers it was really pretty and festive. As we walked back towards the car we had our complimentary mince pie and delicious mulled fruit punch whilst listening to a kids choir singing Christmas songs.

We had a really lovely day out as a family but would we pay almost £30 to go again? Probably not. Parts of it are very tired and need some TLC to make it worth the entry cost.

For more information visit their website
Hatton Country World

*Disclosure
Thanks to Hatton Country World for the family tickets which we received free of charge for the purpose of this review. All opinions expressed are my own.

1

Snowflakes

The kids spent most of the day watching Christmas films and playing with their toys so we had a lovely chilled out day.
For an arty activity, we made good old paper snowflakes. So easy and so effective!

You will need: white paper, a dish or something circular to draw around, scissors, glue stuck, sequins or glitter & coloured paper or tissue paper.

I adapted this from the Usborne book, available from Amazon.

First you need to draw around something circular. I used a small bowl, but it depends on what size you want your snowflake to be.

20131206-194918.jpg

You the need to cut it out and fold the circle in half, and then in half again (excellent fractions teaching/learning opportunity!)

Cut off the corner tip of the cone shape and then snip little triangles and other shapes leaving paper in between them to hold it together.

20131206-195840.jpg

Depending on your artistic capabilities and level of patience (neither my strong points!) you could do some really funky patterns. I’ve seen some brilliant Star Wars themed ones here!

Once you have made your cuts, open it and ta-da – you have your snowflake

20131206-195756.jpg

This bit is the fun bit! Cover one side of the snowflake in glue and then go crazy with the glitter, sequins, jewels, whatever you want to decorate your snowflake.
Once it’s decorated, shake off excess glitter. I then cut out a circle of coloured paper the same size as the snowflake and stuck it on so you could see the coloured paper through the holes in the snowflake. If you were going to put these on the window it round be nice using tissue paper instead as the light would shine through it. We stuck ours up in the kitchen.

Have a go!!!

20131206-200444.jpg

6

3D Christmas Tree

I wasn’t feeling particularly motivated to do much today after decorating late last night so wanted something easy to so with the kids. It started off with me just cutting out a couple of Christmas tree shapes for them to decorate, but ended up as fab 3D trees! Here’s what to do:

Firstly,cut out two basic tree shapes. I use the guide from the Usborne book that I reviewed and used to make the advent calendar yesterday – fold a piece of green A4 paper or card in half, with the longest edges meeting and draw a diagonal line from the top of the fold to the outer corner to make a triangle shape.

20131129-212142.jpg

Then cut along the line. To make the branches snip little triangles out of the open side

20131129-212240.jpg

When you open it out it should be a Christmas tree shape. You need two of these. Then, you need to glue the left hand side of the fold on both trees and stick them back to back

20131129-212420.jpg

You now have a 3D tree!

Because I wanted something relatively low mess and low adult input I just gave Harrison some metallic star stickers to decorate it with, and my large circle punch to punch circles out of Christmassy paper. My punch was a throwback from when I used to make cards. It’s fantastic but a normal hole punch would be ok, just smaller circles. You could decorate with glitter, sequins, ribbons…anything!!

Here’s our finished tree

20131129-212754.jpg

0

Advent Calendar

Today Harrison was much more interesting in helping (hindering?) his dad decorate the living room and Alex was a little grotty from his MMR jabs yesterday so we didn’t do much child – involved activity today, although just before bedtime Harrison decided to draw a picture of a monster!
I decided I wanted to have a go at making something for them, and when I flicked through the ‘100 Christmas Things to Make and Do’ from Usborne I found the perfect thing: an advent calendar.
They both have chocolate advent calendars from my mum but I love the idea of a handmade one.

Firstly, get a piece of cardboard, & cover it in some red paper. Fold a sheet of green A4 paper in half for the tree, with longest sides together. Draw a diagonal line and then cut along it, cutting some small triangles out on the open edge to make the branches

20131128-210001.jpg

Stick a piece of white paper across the bottom for snow and then stick the tree on

20131128-210201.jpg

Cut out shapes (I did circles, squares & triangles) to make the doors. I included Christmas Day so needed 25 of them. I also did them various shapes and sizes. Spread some glue on one edge of the shape and stick it on to make a door.

20131128-210436.jpg

I stuck some little bauble stickers behind each door, but you could draw pictures or stick some cut outs there. Then to finish it off, use a felt to write the numbers on the doors.

And there you have it – a homemade Advent

20131128-213121.jpg